According to the Agency for Healthcare Research and Quality, more than 450,000 total hip replacements are performed each year in the United States.
Whether you’re an avid barbell lifter who’s had a hip replacement or a fitness professional who routinely works with clients who’ve had hip replacements, let’s talk about how to return to squatting!
Who Gets Hip Replacements?
Hip replacements, otherwise known as total hip arthroplasties (THA), are routinely performed on those who have severe hip osteoarthritis with associated pain, range of motion (ROM) deficits, and functional limitations.
ROM limitations are usually seen with hip flexion and internal rotation. In severe cases, people may have trouble or pain with tasks such as walking, stair climbing, stooping, and squatting.
Something important to note here is that just because you may have hip arthritis, doesn’t mean you need a hip replacement.
In fact, about 28% of people over the age of 45 have hip arthritis but only a small fraction of them require surgery. This is because other factors such as muscle strength, functional demands, and your ability to cope with life stressors can all influence your pain experience.
The actual arthritis (or “wrinkles on the inside” as I like to call it) is simply just one piece of the puzzle.
What Actually is a Hip Replacement?
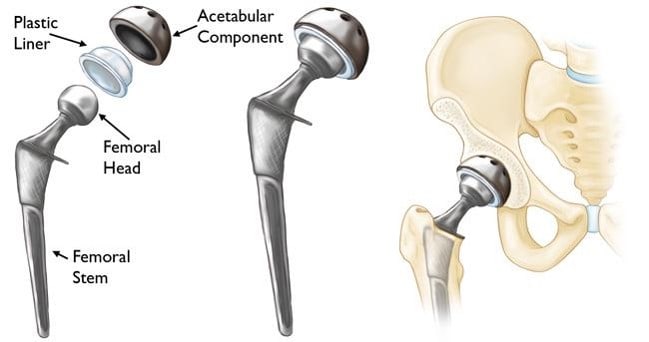
During a hip replacement, the surgeon removes the femoral head and a metal stem is inserted into the femur. A metal or ceramic ball is then placed on the stem to replace the femoral head.
The acetabulum (hip socket) is then removed and replaced with a ceramic or polyethylene socket. Finally, a spacer is placed between the ball and socket to create a smooth gliding surface.
These replacements used to be “metal-on-metal” (a metal ball and a metal hip socket) but this is no longer FDA approved as of May 2010. We’ve found that the metal can actually break down into small particles and get into the bloodstream.
Metal-on-polyethylene seems to be the most common right now in the U.S. However, we are now seeing that the plastic can also break down and produce wear particles in the bloodstream as well.
This is why there seems to be a shift to ceramic parts at the moment. They are more resistant to wear and don’t create any particle breakdown. Ultimately, the choice of the prostheses is up to the surgeon, and what they feel comfortable with.
Precautions After Hip Replacement
After undergoing a hip replacement, patients are generally told to avoid bending at the waist, twisting the leg in or out, and crossing the legs for around 6 weeks. These recommendations are generally referred to as “Hip Precautions.”
The surgeon puts these in place in order to attempt to reduce the risk of a hip dislocation after the surgery. However, these precautions are not “standard” from surgeon to surgeon. They can differ depending on the surgical technique, and some don’t recommend them at all.
If we take a look at the evidence, there’s no evidence to even support these hip precautions, as similar dislocation rates are seen regardless if precautions are set or not.
In fact, it has been shown that patients with hip precautions take longer to rehabilitation and return to their usual activities.
Regardless, if you’ve undergone a hip replacement or are working with someone who has, I’d definitely recommend following the surgeon’s orders if precautions are set.
Strength Training After a Hip Replacement
After undergoing a hip replacement, many people don’t even go to formal outpatient physiotherapy, and are instead just encouraged to slowly resume their regular activities.
This may work fine if you’re someone who isn’t interested in doing anything that’s too physically taxing. However, since you’re reading this article, you’re interested in learning about squatting after a hip replacement. And in order to do this, it’s going to take a bit more work than simply “walking it off.”
In fact, it’s been shown that patients with the best muscle strength have higher physical function, quality of life scores, and lower pain scores.
There is also no evidence to suggest that strength training prematurely “wears down” the hip prosthesis.
This is actually a misconception, as strengthening the muscles and connective tissues AROUND the joint replacement disperses the load better and allows for better force transfer.
Squatting After a Hip Replacement
Before following the advice below, be sure that you’re cleared by both the surgeon AND the physiotherapist to participant in resistance training. This is usually around 8-12 weeks after the operation.
Even after getting the green light to resistance train, however, there still may be continued ROM limitations. It’s important not to force through any ROM that is painful or not there yet. So where do we start?
Step 1: Start with the Supported Squat
When it comes to performing squats after a hip replacement, the supported squat is my first choice.
Performing a supported squat involves holding onto a sturdy object like a pole or squat rack with both hands and then squatting down.
Holding on will allow you to put as much weight through your hands as needed to allow it to feel comfortable for your hip.
This is also an ideal time to see what kind of stance width and degree of toe out works best for you. Basically, you just want to see what kind of foot placement allows you to get as much pain-free depth as possible.
Sometimes narrow stances and a toe forward position feels best, and sometimes people will require more toe out. This is highly individualized and you’ll have to experiment to see what feels best for you or your client.
Additionally, if you take a look at the image below, you can also modify the trunk angle with the supported squat. In general, a more vertical torso and forward knee translation will be more tolerable in the early stages after a hip replacement, as it requires less hip flexion (left picture).
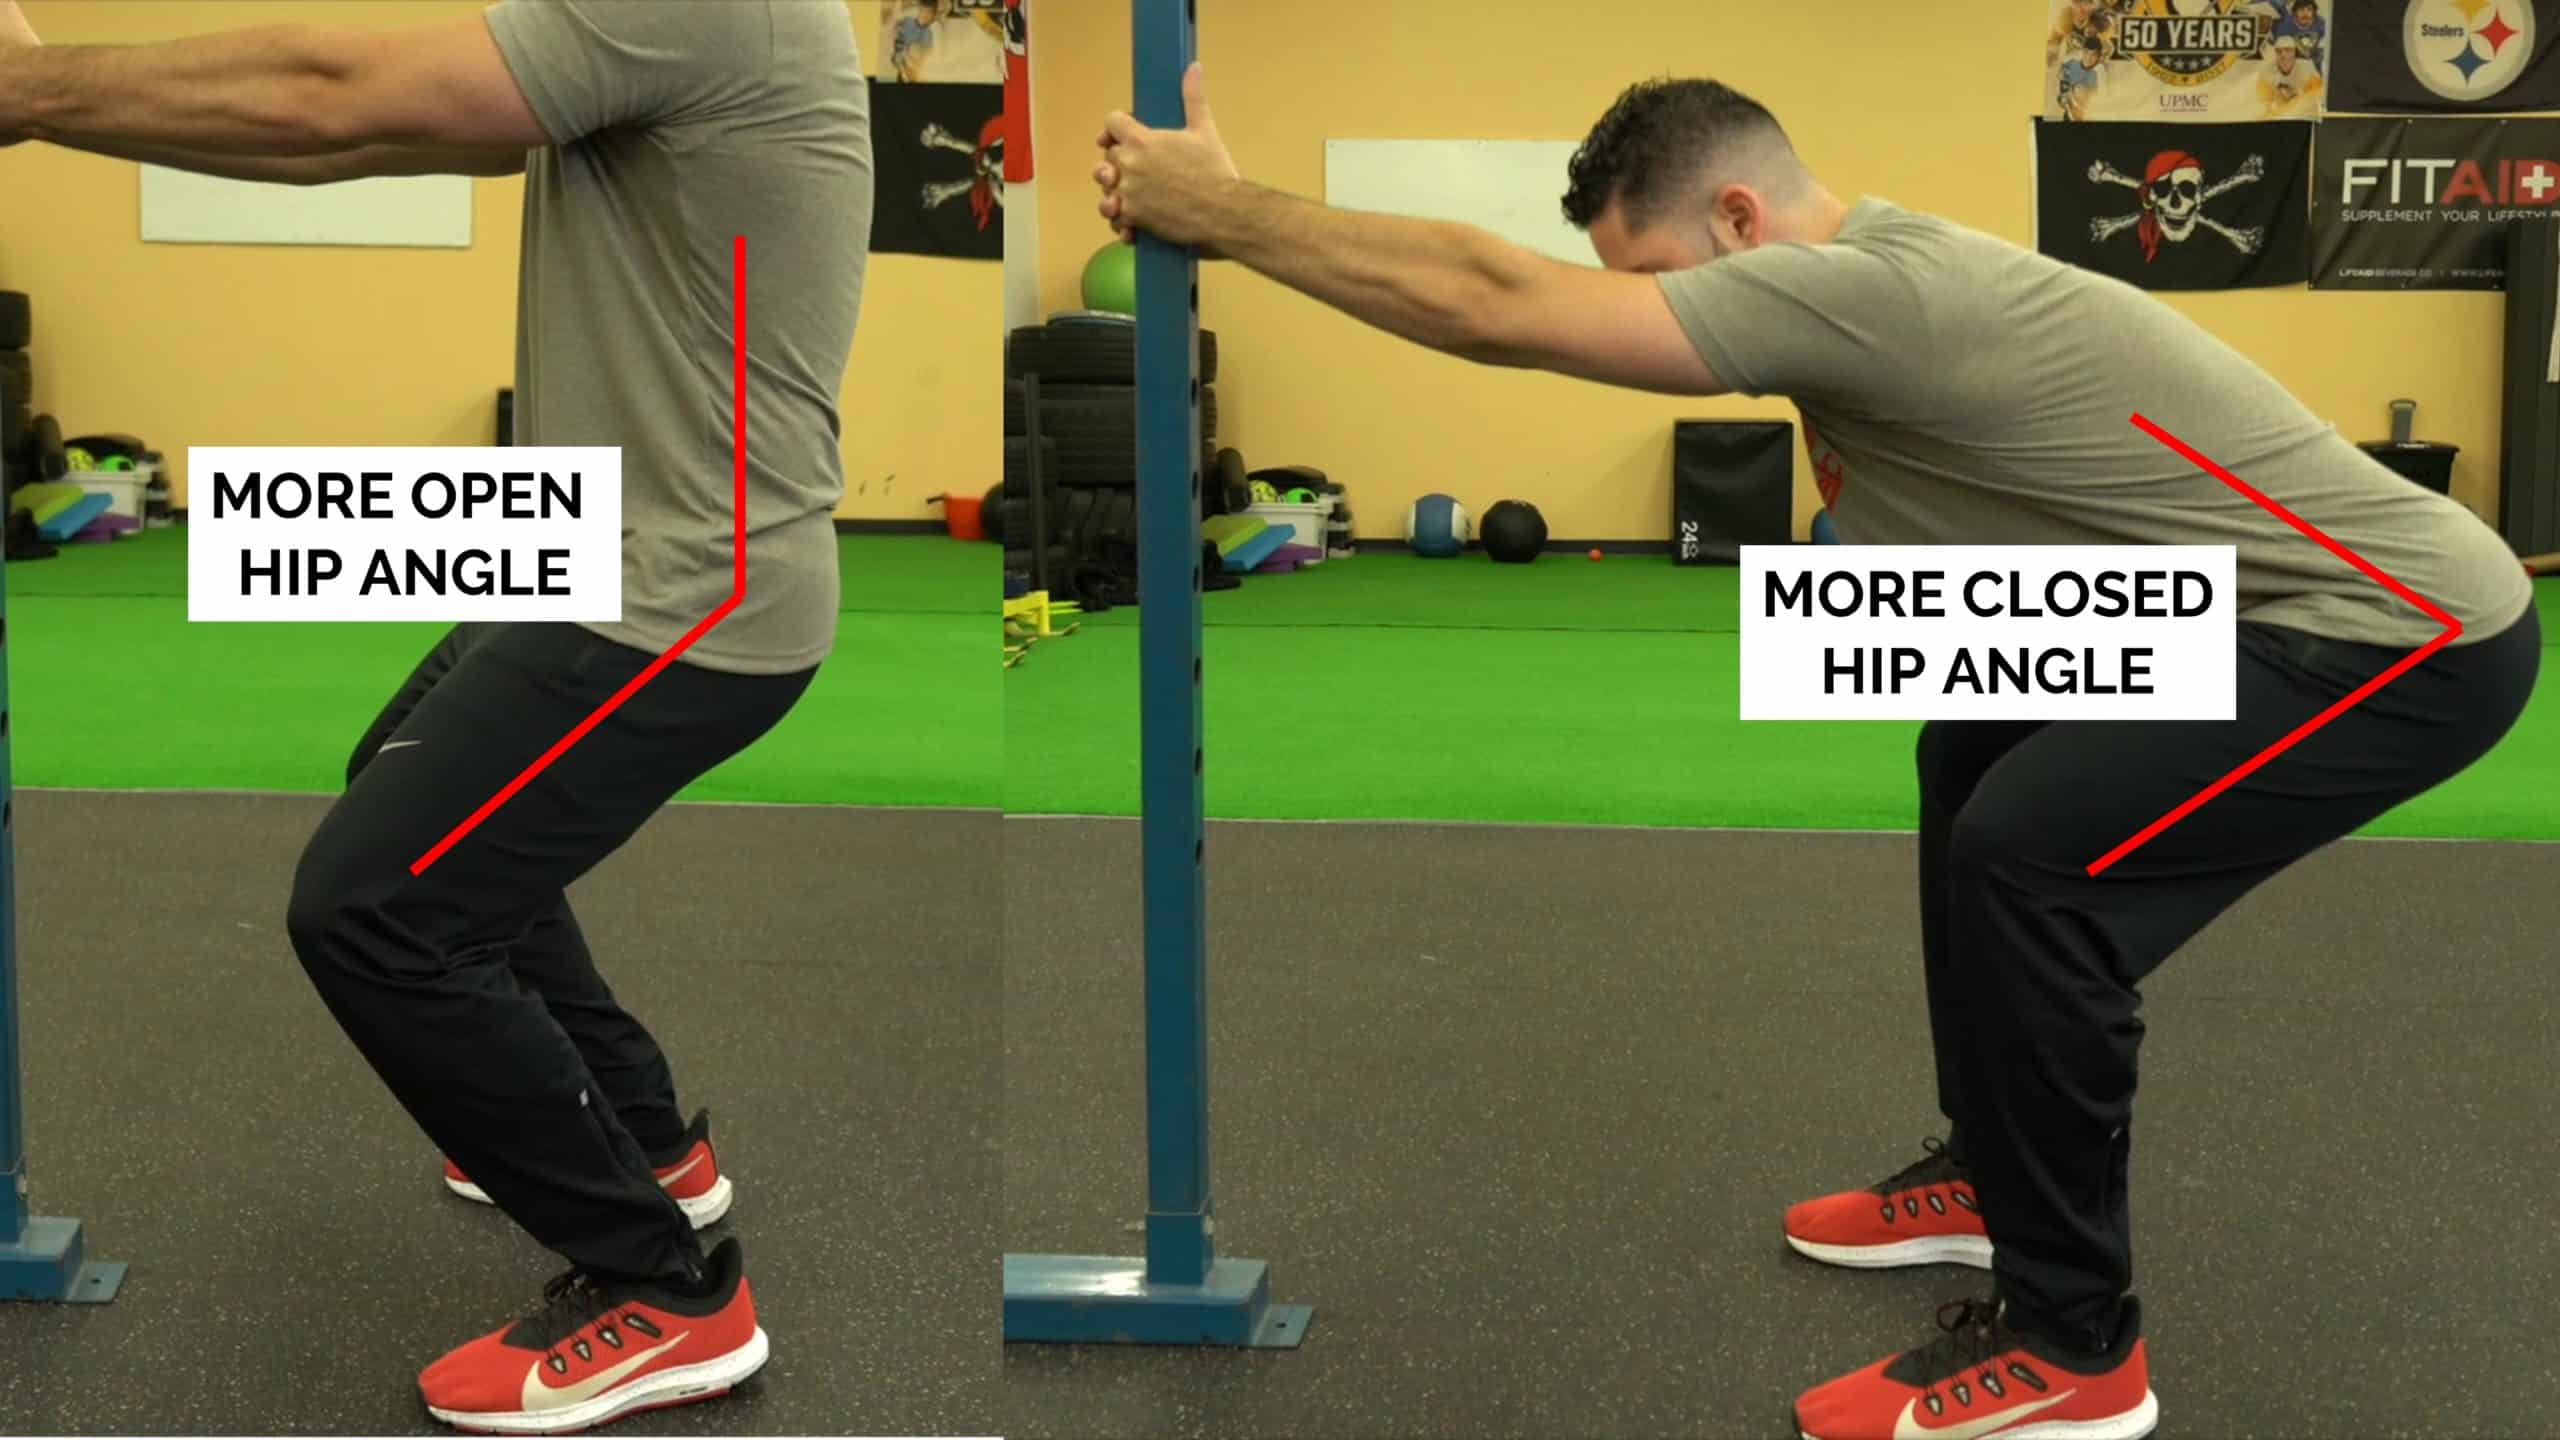
On the other hand, leaning forward essentially closes off the hip angle (right image). While there’s nothing inherently wrong with this, (it’s actually recommended if you’re dealing with knee pain) you may want to limit significant forward torso lean in the early stages after a hip replacement.
Step 2: Move to a High Box Squat
Once you feel comfortable with the supported squat, you can move to a box squat with external load. The goal here is to set the height of the box to a depth that you can comfortably squat to without any hip pain or pinching. Then, as you start to adapt and are able to squat deeper, you can lower the height of the box.
I like using a small box, and putting multiple bumper plates on it. Then, as you feel more comfortable squatting deeper, you can just remove one plate at a time, until you’re at your desired depth!
This process can be done while holding a kettlebell or dumbbell in the goblet squat position, or with a barbell on the back in the high bar position. If the goal is to get back to the back squat and you can tolerate having a barbell on your back, then it’s fine to just start this process with the empty barbell.
If the 45lb barbell is too heavy for you or your client, then I’d recommend starting this process utilizing the goblet squat position as the form of external resistance.
Step 3: Switch to the Low Bar Squat if That’s the Goal
As mentioned above, torso angle also affects hip flexion ROM. The more you incline the torso forward, the more hip flexion that is required.
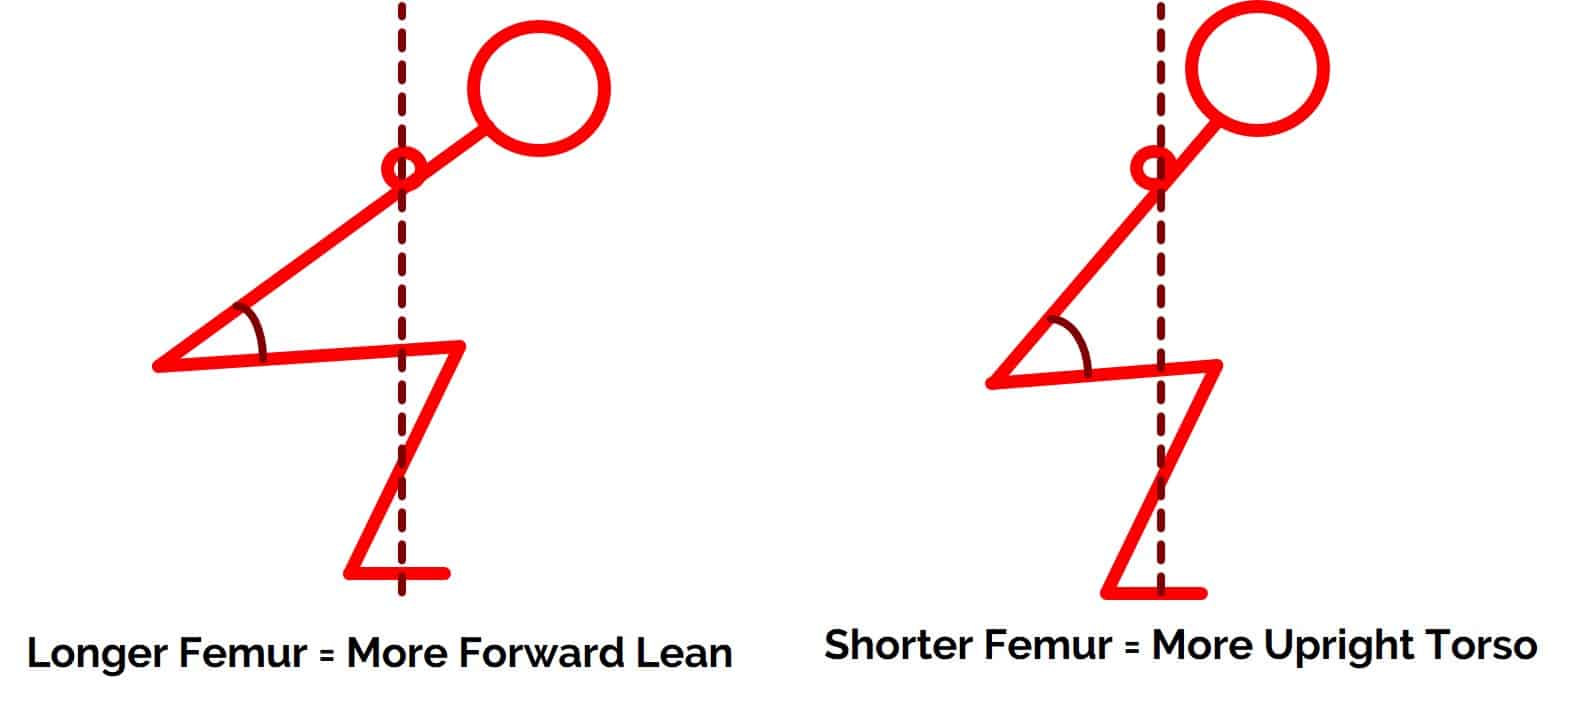
Trunk angle during the squat is determined by two factors: relative femur length and bar position.
Relative femur length. Those with longer femurs relative to their tibias are going to inherently lean forward more during the squat in order to keep the barbell balanced over the middle of the foot.
Those with shorter femurs, on the other hand, are going to naturally be more upright. While this isn’t obviously something you have control over, it is something to be aware of. Squatting with a barbell on your back with relatively longer femurs will require more hip flexion.
Bar position. Performing a low bar squat, where the barbell rests on a muscular shelf created by the rear deltoids will also cause you to lean forward more in order to keep the barbell centered over the middle of the foot.
Unlike femur length, this IS something you have control over. Remember, more torso lean means more hip flexion. You can learn more about the differences between the high bar and low bar squat right here.

This is why I recommend to start with the high bar squat when initially squatting after a hip replacement. Then, once you start to adapt and feel more comfortable, you can start low bar squatting if that is your goal.
Step 4: Remove the Box and Progressively Load
Once you can comfortably box squat to your preferred depth, it’s time to remove the box. Up until now, you’ve been relying on the box to help maintain a consistent depth, but now you’ll have to rely on muscular tension and the stretch-shortening cycle.
Because you’ll be making this transition, you want to make sure you start with a light weight. I’d recommend choosing a weight and doing 3-4 sets of 4-6 reps in the RPE 4-6 rep range.
For more detail on this process and the rationale behind it, check out this article. No amount of form optimization or modification will work if the dosage (volume, intensity, frequency, etc) is off!
Step 5: Don’t Forget Single Leg and Accessory Work
If your goal is to get back to squatting after a hip replacement, then you should absolutely prioritize the above information. Start with the supported squat, transition to high bar box squat, and then gradually increase the ROM and change to a low bar squat if that’s your goal. However, you should also dose in single leg and accessory work.
After a hip replacement, it’s inevitable that the leg that was operated on will be significantly weaker than the non-operated one. If all you do is squat, your non-operated leg may end up doing more work which can lead to a muscular imbalance and a hip shift at the bottom of the squat.
Basically, your non-operative leg can end up “pushing” more than the leg with the hip replacement, and this can cause your body to shift AWAY from the operated leg.
To remedy this, you want to make sure you’re also performing unilateral lower body exercises like lunge and single leg squat variations in order to “tease out” and really force the strength adaptation on the operated leg.
This can be done simultaneously with the squat progression listed above. To learn more about hip shifts during squats, read this.
Tying it All Together
Squatting after a hip replacement can be a scary task, but it can be done safely by using the recommendations above. To recap:
- Make sure not to start this process until at least 8 weeks after the surgery and ensure you have the permission from both the surgeon and physiotherapist to do so.
- Start with the supported squat variation. This will allow you to experiment with different stance widths and degrees of foot flare to find what feels most comfortable for you.
- Once you’ve found a comfortable stance, you can then progress to a box squat, setting the height of the box stacked with bumper plates on top to a tolerable depth.
- Then, as you start to adapt, slowly remove one bumper plate at a time to incrementally increase the depth. This process can be done with external load such as goblet squat or high bar back squat
- Finally, transition to the low bar back squat if that’s the goal and remove the box. Remember to initially keep the RPE low (4-6 range) and work on slowly increasing intensity from there!
Use the tips above to safely return to squatting after a hip replacement.